On the first properly cold evening of the year, the heating clicks on and the house does that little sigh of relief. You walk past the radiator, hold your hands over it for a second, and there it is - that faint baked-dust smell you tell yourself is “just because it’s the first time this year”. You wipe the top with your sleeve, promise you’ll give it a proper clean “one weekend”, and promptly forget.
What you don’t see, unless you bend down with a torch and a mild sense of dread, is the thick grey fluff sitting inside the radiator - the bit that never meets your cloth. That hidden layer is what’s making your rooms smell stuffy, your walls grubby, and your heating work harder than it needs to. The good news is you don’t need a gadgety steamer or an entire afternoon to sort it. You just need one very unglamorous tool that costs less than a takeaway coffee.
The myth of the “quick wipe” radiator clean
Most of us clean radiators the same way: quick flick of a duster across the top, maybe a half-hearted go at the front panel if guests are coming. It looks fine from eye level, so we tick “radiators” off the mental cleaning list and move on.
The trouble is, radiators don’t just radiate heat. They pull cool air in at the bottom, warm it as it travels up the fins inside, then throw it back out at the top. Every time that happens, the air drags dust with it. That dust doesn’t sit politely on the outside; it collects in the channels you never touch, layering itself into a small grey duvet.
So you end up with radiators that are clean where you can see them and filthy where it actually matters.
Why the inside of your radiator matters more than you think
There are three main reasons to care about the hidden bits, and none of them are purely cosmetic.
First, the smell. That slightly burnt, dusty scent when the heating comes on? That’s warm air passing over years of fluff. You can open a window, light a candle, spray something floral over the top – but until the dust goes, the whiff will keep coming back.
Second, your health. Radiators are brilliant at taking whatever is in the dust - pollen, pet hair, skin flakes - warming it and sending it around the room. If you’re prone to allergies or asthma, those cosy-looking fins are basically a tiny, gentle dust storm machine.
Third, efficiency. Dust acts like a jumper around the hot metal, making it harder for heat to escape into the room. No, cleaning radiators won’t halve your bills, but removing thick build-up can help them warm up faster and distribute heat more evenly. In a winter of high energy costs, you might as well let every watt do its job properly.
In other words, if you only ever wipe the outside, you’re cleaning the bit that matters least.
The under-£3 tool that actually reaches the dirt
You can, technically, try to wedge a damp cloth onto a ruler and poke it down the back. You can also tape a duster to a wooden spoon and hope. Most of us do that once, shower ourselves in fluff, and decide radiators are “too much faff”.
The thing that quietly fixes this is painfully simple: a long, flexible radiator brush. They’re usually:
- A slender, bendy wire core
- Covered in soft bristles or microfibre
- Around 50–70cm long, sometimes more
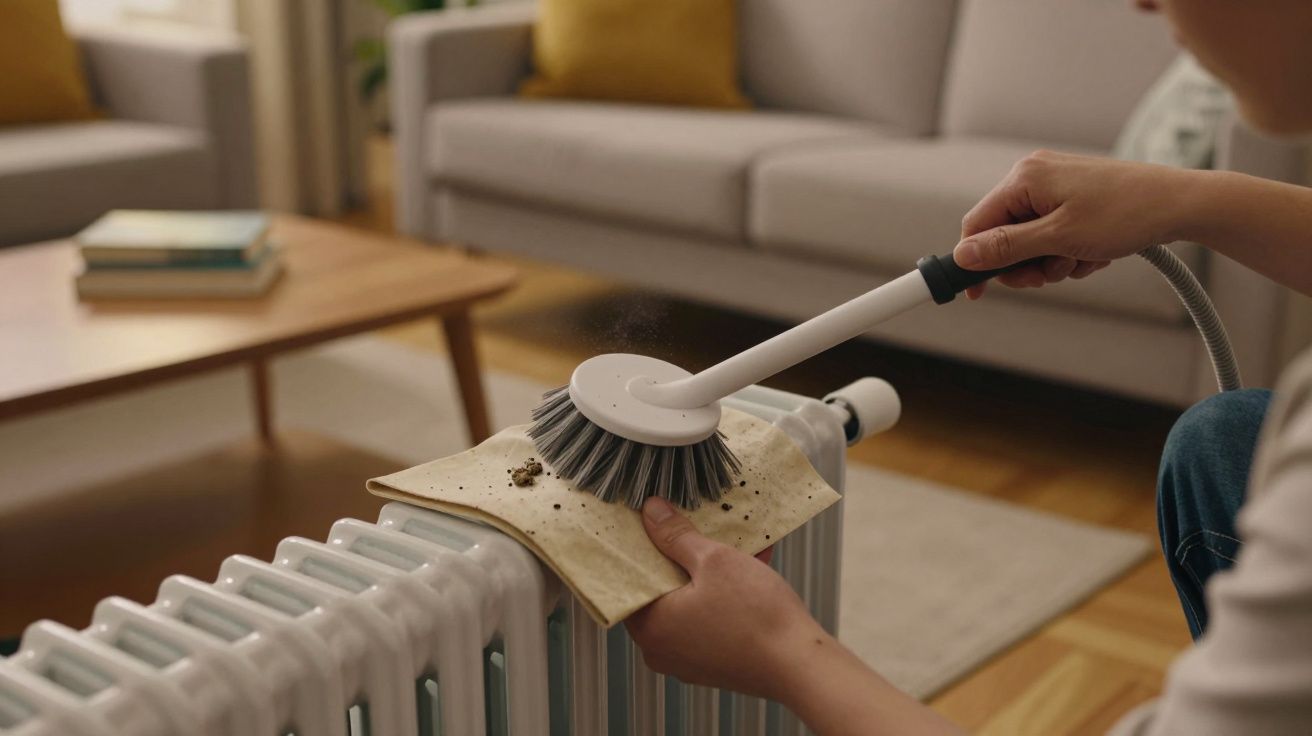
You’ll find them in discount shops, supermarkets and DIY aisles for around £2–£3. They look unimpressive, like an overgrown bottle brush, but they do one crucial thing your normal duster can’t: they snake right down between the radiator fins and pull the dust out in one smooth sweep.
You don’t need a special spray, or a steamer, or a new hoover. You just need the right shape of brush.
How to dust a radiator from the inside out
Once you’ve got the brush, the actual clean is surprisingly quick. Think “commercial break” rather than “all-afternoon project”.
Step-by-step:
Turn the heating off and let the radiator cool.
Warm metal plus dust equals baked-on grime. Cool is safer and cleaner.Lay an old sheet or towel underneath.
This catches the dust avalanche before it hits your carpet or skirting boards.Hoover the obvious bits first.
Run the nozzle along the top grill and down the back gap as far as it will reasonably go. You’re just taking off the loose layer.Brush from the inside downwards.
- Feed the radiator brush in from the top grill so it slides between the fins.
- Gently push it all the way down, then draw it back up.
- Dust will tumble out underneath onto your sheet in deeply satisfying clumps.
- Repeat across the width of the radiator, then from the back gap if you can reach.
- Feed the radiator brush in from the top grill so it slides between the fins.
Hoover up the fallout.
Fold the sheet in on itself so you don’t trail fluff through the house, and hoover it or shake it outside.Finish with a quick wipe.
A damp microfibre cloth over the front and sides takes care of any stray streaks and finger marks.
For most radiators, that’s a 5–10 minute job. On the worst offenders - the big hallway one that’s been quietly collecting dust since 2014 - give it an extra sweep or two. You’ll know it’s done when the brush starts coming out with only a light grey haze instead of thick clumps.
Small tweaks that make it even easier
You don’t need a full cleaning arsenal, but a couple of tiny tweaks can make the job almost mindless.
Set a reminder twice a year.
One at the start of heating season (early autumn), one at the end (spring). Tie it to something you already do, like bleeding the radiators or swapping summer/winter bedding.Use the hairdryer trick for awkward spots.
If you’ve got a very slim or decorative radiator where a brush won’t fit, put a towel behind it, set your hairdryer on cool or low warm, and blow down from the top. You’ll still want to hoover afterwards, but it shifts fluff that’s clinging on.Mind the wall behind.
While you’re there, a quick wipe of the wall directly behind the radiator stops that faint grey “radiator outline” forming over time.Pets? Do it a bit more often.
Pet hair loves warm metal. If you share your home with a moulting companion, every couple of months during shedding season is sensible.
Here’s what you’re really doing, in simple terms:
| What you do | Where | Why it helps |
|---|---|---|
| Brush dust out | Inside fins and gaps | Stops burnt-dust smells, improves airflow |
| Hoover and wipe | Under and around radiator | Stops fluff resettling and marking walls |
| Repeat twice a year | Whole house | Keeps build-up low with minimal effort |
A tiny job that makes your whole house feel fresher
The next time the heating kicks in after you’ve done this once, you’ll notice the difference more than you expect. The same warmth, but less of that faint, tired smell. Rooms feel crisper. If you have allergies, you may find you sneeze less when the radiators first heat up.
It’s one of those “why didn’t I do this years ago?” jobs. For under £3 and a few minutes with a bendy brush, you’re not just polishing the visible bits - you’re cleaning the part of your heating that actually does the work. After that, the “quick wipe” on the front really is quick, because the hard part is already handled where you can’t see it.
FAQ:
- How often should I clean inside my radiators?
For most homes, twice a year is enough - once before you start using the heating regularly, and once when you switch it off for spring. If you have pets or allergies, every three months is better.- Will a radiator brush scratch the paint?
Proper radiator brushes are designed with soft bristles or microfibre, so they’re gentle on paint and metal. Avoid anything with sharp wire ends or very stiff bristles.- Can’t I just hoover the top and leave it at that?
Hoovers are great for loose dust you can reach, but they struggle to get deep between the fins. A brush physically drags out the compacted fluff that’s affecting airflow and smell.- Does this work on electric radiators and towel rails?
Yes, as long as they’re completely switched off and cool first. Be extra careful around exposed heating elements and always follow the manufacturer’s cleaning advice.- Do I need any special cleaning spray?
No. Dry dusting with a brush and hoover does most of the work. A simple damp cloth with mild soapy water on the outside surfaces is plenty for day-to-day grime.


Comments (0)
No comments yet. Be the first to comment!
Leave a Comment